When you get advice on the importance of staying active for bone health, you tend to hear a lot about weight bearing exercises that strengthen your muscles and bones — and for good reason.
But a key part of your body, called fascia, often gets overlooked in that discussion.
Research shows fascia attaches our soft tissue system to our bones and that it has a profound effect on our joints, nerves, and alignment. In fact, the build up of fascial adhesions can pull on bones or joints, stop blood from flowing, compress nerves, and cause all kinds of pain and alignment issues.[1][2][3]
In this article, we’ll highlight why keeping fascia healthy is so vital for bone health and how to incorporate self-myofascial release into your routine to keep your fascia in tip-top shape.
Fascia Overview
What is Fascia?
Fascia is a thin casing of connective tissue that’s composed mostly of collagen. It’s located all over your body and it surrounds and holds every organ, blood vessel, bone, nerve fiber, and muscle in place. This elaborate connective tissue system has three layers:
- Superficial (connected with your skin)
- Visceral (surrounds your internal organs)
- Deep (surrounds your bones, nerves, muscles, arteries, and veins)
Although your superficial fascia is connected with your skin, it also adheres to the deep fascia. In part, deep fascia is free to glide over muscles, and in part it is firmly anchored to the bone. Each layer of fascia has a liquid between it called hyaluronan (hyaluronic acid). And this liquid is what helps your fascia stretch when you move.
But stress, trauma, and inflammation can cause hyaluronan to dry up and damage your fascia. And when your fascia tightens it can hinder the movement of your tissues and muscles. Unfortunately, this can result in pain and other health conditions.
Moreover, when the fascial continuum fails to flow properly through its different layers, an inflammatory environment is created. And the cytokines produced could stimulate the activation of osteoclasts and bone resorption. Over time this can contribute to osteoporosis.[4]
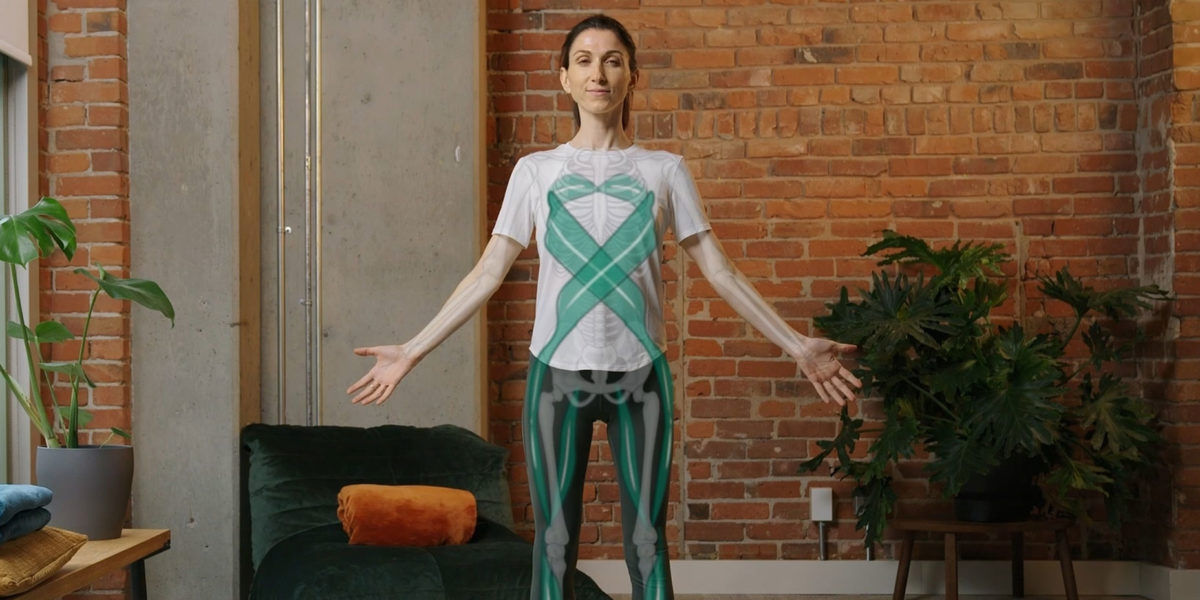
What is the Role of Fascia?
As you can imagine, something that envelopes your entire body is going to have more than one function. So what are these many hats that fascia wears? Well for starters, it shapes us, aligns us properly, and allows our muscles to work.
Plus, it can provide support for your surrounding tissues and help reduce friction. And it plays a supportive role for your tissues and organs.
Moreover, fascia can transmit mechanical tension generated by muscular activity or external forces.[5]
In fact, deep fascia is considered a key element to transmit load in parallel bypassing the joints, transmitting around 30% of the force generated during a muscular contraction.
What Happens to Fascia As We Age?
When we’re young, our fascia is supple, fluid, and healthy. But as the years creep up, our once slippery, flexible, and smooth fascia can thicken and become sticky.
A number of things can cause fascia to become gummy and crinkle up (a process called adhesion) including:
- Stress
- Anxiety
- A sedentary lifestyle
- Trauma from injury or surgery
- Overuse from repetitive movements
As mentioned earlier, when fascia thickens and becomes sticky, it dries up and tightens around muscles. And this can result in limited mobility and cause painful knots to develop.[6]
It can also impact the ability of the deep fascial tissue layers to glide along adjacent tissue interfaces — such as along adjacent muscle or bone.

How Does Fascia Relate to Bone Health?
The fibroblasts — the foundations of the fascial system — affect the immune system, and as a consequence bone tissue. This phenomenon is called osteoimmunology.[7][8]
Your bone tissue and immune system share molecular interactions, including signal molecules, transcription factors, and membrane receptors. In particular, osteoclasts are sensitized by cytokines, and vice versa.[9]
When the layers of the fascial continuum do not slide properly over one another — from the most superficial layer to the periosteum — an inflammatory environment develops, either acute or chronic. As a result, cytokines could activate the osteoclasts and bone resorption. Over time, this can generate osteoporosis.[10][11]
Ways to Improve Fascia Health
To varying degrees most of us have unhealthy fascia. That’s because when we were young, we didn’t learn how to take proper care of it.
To stay healthy, fascia depends on space and nutrient-rich blood. Space allows blood to flow. And blood nourishes every cell in your body so your fascia, joints, muscles, tendons, ligaments, and organs stay healthy.[12]
Fascia can be cared for by:
- Acupuncture
- Regular stretches
- Staying active throughout the day
- Focusing on posture when sitting or standing
- Eating a nutrient rich diet and staying hydrated
- Bodywork techniques like self-myofascial release
- Therapies including heat, massage, and yoga therapy

Self-Myofascial Release
What is Self-Myofascial Release?
As the name implies, self-myofascial release — or ball rolling — is a technique that you can perform on yourself with a tool — rather than having a clinician perform manual therapy on you.
This technique involves applying gentle, sustained pressure on targeted areas of fascia that surround your muscles and bones. By rolling out key areas, you can soften and release the fascia.
As a result, you can relieve tension, release stress, and help the body relax overall. This bodywork technique is super easy. Plus, you can do it in the comfort of your own home!
Benefits of Self-Myofascial Release
There are several benefits self-myofascial release brings to the table including:
- Improves mobility
- Helps prevent injury
- Augments performance
- Aids in recovery from exercise
- Allows bones to become more weight bearing
- Reduces soreness and improves tissue recovery
- Improves muscle flexibility and joint range of motion
- Improves gliding of the body’s structures including skin, fat, and fascia
- Reduces sensitivity to pain, improves sleep, and relieves anxiety[13]
Mechanisms of Self-Myofascial Release
During self-myofascial release, the mechanical stimulus initiates a number of potential neurophysiological effects from the peripheral and central nervous system such as:
- Increase of stretch tolerance
- Refreshing of the somatosensory cortex
- Proprioceptive stimulation
- Fluid change
Moreover, a process of descending inhibition occurs in which painful sensory receptors are turned down and there is an increase in the chemical reactions that make you feel better.
So pain relief is induced through descending modulation from your brain. (Numerous neurotransmitters, including adenosine, endocannabinoids, endogenous opioids, oxytocin, serotonin, and vasopressin have been shown to turn down the volume, or completely eliminate, pain output.)
What is more, during self-myofascial release there is a decrease in fascial adhesions, or scar tissue. This is good news because adhesions, scar tissue buildup, and overall tightness are often the underlying causes of back pain, headaches, and joint pain.
Self-Myofascial Release Guidelines
Although this technique is very simple, you should still exercise precautions while performing self-myofascial release to ensure you get the most benefit from it.
It’s important to be gentle. So don’t aim for maximum sensation. Remember that the key is to hydrate the area — not induce inflammation. And avoid applying pressure directly to your bone. Instead, focus on riding along the edges of your bone.
Moreover, you should avoid sensations or nerves that feel sharp, radiating, or shooting. And definitely avoid swollen tissue. Lastly, feel free to incorporate various techniques based on the tool you decide to use.
Myofascial Release Methods
Now that you have your safety guidelines down, let’s take a look at the different ways you can execute self-myofascial release.
So first up would be the pin and hold. And it’s pretty much what it sounds like. You pin the tool in one place. Then you hold it there while taking some full, steady breaths.
Another method you can try involves flushing along the length of the muscle or fascia. Basically you’ll move in the same direction as the grain of the muscle or fascia fiber.
You can also move in the opposite direction of the grain of the muscle or fascia fiber. And this method is referred to as compress and shear.
Self-Myofascial Release Tools
Of course, you’ll need some tools to make the magic of self-myofascial release happen. Fortunately, the ones you’ll need are very easy to come by and use. In fact, one of the best tools to use is a ball.
That’s right – the ball is your friend (think tennis or lacrosse).
A lacrosse ball is great for working on your hands, forearms, or feet. Both a lacrosse and tennis ball are good options for working on your hamstrings, calves, abdomen, buttocks, upper and lower back, deltoids, and neck.
Remember, the ball you select should have a good grip and not slide easily against a wood floor, wall, or your skin.
Self-Myofascial Release Techniques (with Video Tutorials)
Now let’s dive into some self-myofascial release techniques. To perform these moves you’ll need a lacrosse ball, a small towel, or a pillow. A tennis ball is a good alternative if you would like to apply a more gentle pressure.
1. Foot
This first technique will focus on using self-myofascial release on the foot.
- Have a seat and station your lower leg about perpendicular to the floor. Place the ball just behind the knuckles of your toes.
- Roll the ball forward. Keep your foot pointed down.
- Roll back and take your heel down toward the ground. Be gentle and don’t apply too much pressure.
- If you find a spot that is sensitive or uncomfortable, work around the spot a little longer, without jamming the ball directly into that spot. (And always avoid any bony points of the foot)
- Do this move for 2-5 minutes on each foot to relieve tension.
2. Calf
This next move will focus on using self-myofascial release on the calf.
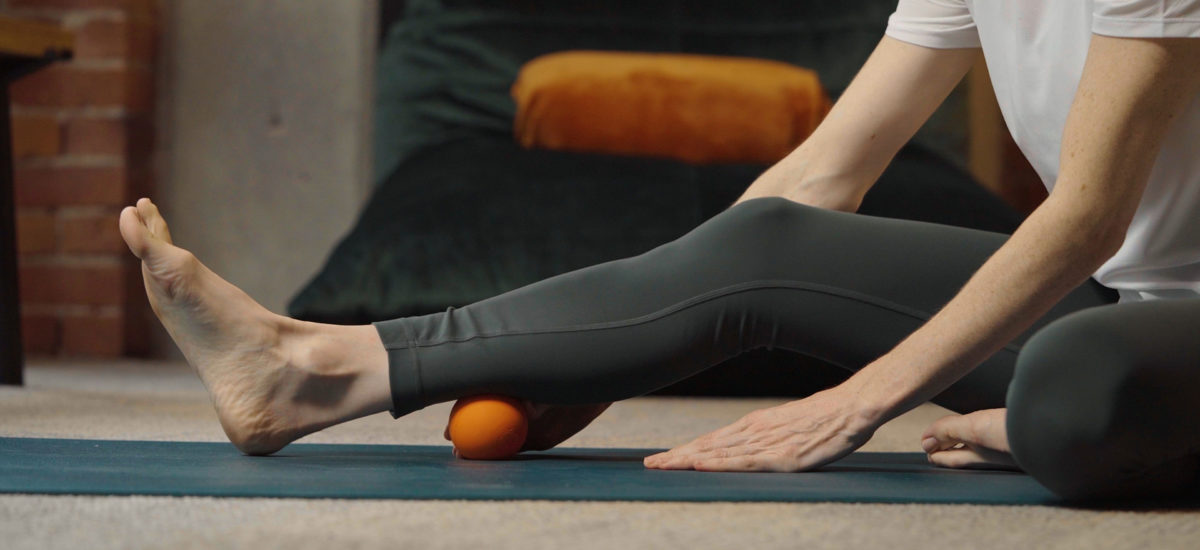
- Start seated on the floor with one leg outstretched (you can sit on a pillow if that is more comfortable)
- Place the ball between the floor and the bottom of your calf muscle and start shifting your calf side to side for a minute or two
- Move the ball up higher along the calf and repeat. Continue this process until you reach just below the knee.
- Now place the ball in the location where you notice the most tension. Simple pin and hold the ball there. (You can add more pressure by crossing your other leg over top – but remember to be gentle and not aim for maximum sensation)
- As you hold the ball down, make about 10 circles with your ankle in both directions
- Then point your toe and move the foot side to side (inverted and everted)
3. Hamstring
Now we’ll work our way up to the tissue around the hamstrings.
- Sit at the edge of a chair, ideally at a height that gives your leg room to hang (a high stool or counter top can work well here)
- Place the ball just below the base of the hip, gently pinning the ball between your leg and the chair
- Now straighten your leg and move it in and out of an extended position for minute or so
- This might feel slightly uncomfortable, but if you find a spot that is particularly tender and painful, move the ball around that spot, without applying direct pressure
- Continue this technique as you move the ball lower towards the knee, without fully reaching the knee
4. IT Band
This next technique target the fascia around the IT Band
- Lay down on your back – you can place a pillow under your head for comfort
- Feel the lateral side of your thigh with your hand and notice where your hip bone is – you want to avoid placing the ball on this bony area. Instead place the ball just below and around it
- Now slow start to roll onto your side, pinning the ball into the ground. The more side lying you go, the firmer the pressure will be – so don’t go too far!
- Find the pressure that creates slight discomfort, but not pain, and hold from 30 seconds to 2 minutes.
- Now place the ball a little further down the lateral side of the thigh and repeat the same technique of rolling slightly on your side to pin the ball down
- Continue moving down the leg and stop before your reach the bony area of the knee
5. Glute
This is a great technique to release tension at the top of the glute
- Find a wall or door to stand at
- Place the ball just below your belt line, below and to the side of any bony area – without applying pressure directly to bone.
- Pin the ball between the top of your glute and the wall by gently leaning into it, without pressing so hard that you cause yourself pain.
- Simply hold here for at least thirty seconds, or adjust the pressure back and forth from lighter to firmer
- Then, slowly shift ever so slightly side to side, as you feel the tension release
- If you find a spot that is particularly sensitive, work the tissue around that spot, avoiding direct pressure and pain
6. Quad & Hip Flexor
Next we’ll move to the front of the leg and target the quad and hip flexor.
- Place the ball toward the top of your thigh right in the middle. Lie down on top of the ball, facing the floor. Rest your forehead down on your hands to allow your back to relax.
- On the same side that the ball is on, slow kick your leg toward your back. Doing this puts pressure on the muscle as you lightly move it through a stretch. Do this move ten times.
- Then with the foot relaxed, do some breathing to engage the diaphragm. As you breathe in, push your belly into the surface you’re laying down on.
- Take a deep breath in through your nose and exhale through your mouth. Keep your head down and take five deep breaths.
- Repeat the same sequence (10 kicks and 5 breaths) in each of these spots: a little bit off to the side, a little bit into the groin, and a little bit into the lower abdomen.
7. Shoulder
This technique will focus on using self-myofascial release around the shoulder.
- Lie down on your back and place your arm out to the side at about a 45 degree angle. Use a small towel or thin pillow to prop the elbow up slightly to make the movement more comfortable.
- Place the ball between your shoulder and the surface you’re laying down on, avoiding the bone. Apply gentle pressure to the back of the shoulder and work your way down toward the edge of your shoulder blade.
- As you rest your arm on your pillow, press your shoulder back and down to put pressure on the ball. Keeping the top of your arm and elbow down, lift your hand up and move your forearm back and forth about 10 times
- Don’t lift your elbow off the pillow and don’t move to the point where you feel a lot of stress or tension.
- Move the ball around a little bit and apply the same technique to different areas of tension.
8. Pec
Our last technique releases tension in the tissue around the pectoral muscles.
- First, find a wall to stand at.
- With your hand, locate the meaty portion of your pec to the side of your armpit and move your fingers slightly up and inwards noticing areas of tension
- Now stand facing the wall, place the ball in that meaty portion of your pec and lean into the wall to pin the ball in place for about 30 seconds, without applying too much pressure.
- Shift very slightly side to side for another 30 seconds or so.
- Now extend your arm up and to the side along the wall and, keeping the neck relaxed, turn away and back very slightly about 10 times.
Fascia and Nutrition
While it’s important to practice techniques such as self-myofascial release to keep your fascia healthy, it’s also critical to stay hydrated.
Hydration is an important component for the proper maintenance of bone tissue. After all, water represents about 15%–25% of the total volume of bone.[14]
Often dehydration makes fascial pain worse. So make sure you consume an adequate amount of fluid. And that your cells are retaining that fluid.
How do you make that happen? It’s simple — just make sure you drink water that contains electrolytes. If you think that’s not enough, consider adding moistening herbs in infusions such as licorice root, marshmallow root, and plantain leaf.
And make sure to get your daily dose of protein. Connective tissue can’t be made well without adequate protein. If you want to have healthy fascia you need protein (think gelatin). It’s also key to eat nutrient dense foods — especially ones that contain essential fatty acids (fish oil), vitamin C and its cofactors (think brightly colored fruits), and calcium and magnesium.[15]

Takeaways
There are several factors to consider on your path to healthy bones. And one that is often overlooked — yet very important, is fascia.
Of course, staying hydrated, consuming a healthy diet, and exercising will help your bones stay strong. But if you aren’t keeping your fascia in fighting shape, you may still run into issues.
If you want to make sure you’re keeping your fascia healthy, try adding self-myofascial release to your routine and consider incorporating some of the other practices mentioned in this article.
For more information on bone health and healthy-living tips, sign up for our newsletter for regular tips and updates.
References
- WebMD Editorial Contributors “Adhesions, General and After Surgery” Medically Reviewed by Sabrina Felson, MD on June 08, 2022, https://www.webmd.com/a-to-z-guides/adhesion-general-post-surgery
- Martin Ulloa, MD and Mauricio Coronel Banda, “Scar Tissue Causing Saphenous Nerve Entrapment: Percutaneous Scar Release and Fat Grafting” Plast Reconstr Surg Glob Open. 2017 Sep; 5(9): e1495. Published online 2017 Sep 25. doi: 10.1097/GOX.0000000000001495
- M Hase “Adhesions in the temporomandibular joint: Formation and significance” Australian Dental Journal 2002;47:(2):163-169 https://onlinelibrary.wiley.com/doi/pdf/10.1111/j.1834-7819.2002.tb00322.x
- Bruno Bordoni and Emiliano Zanier “Clinical and symptomatological reflections: the fascial system” J Multidiscip Healthc. 2014; 7: 401–411. Published online 2014 Sep 18. doi: 10.2147/JMDH.S68308
- Adrianna Gatt; Sanjay Agarwal; Patrick M. Zito “Anatomy, Fascia Layers” Last Update: July 25, 2022. https://www.ncbi.nlm.nih.gov/books/NBK526038
- https://www.hopkinsmedicine.org/health/wellness-and-prevention/muscle-pain-it-may-actually-be-your-fascia
- Ginevra L Liptan, “Fascia: A missing link in our understanding of the pathology of fibromyalgia” J Bodyw Mov Ther, 2010 Jan;14(1):3-12. doi: 10.1016/j.jbmt.2009.08.003, PMID: 20006283 DOI: 10.1016/j.jbmt.2009.08.003
- Giorgio Mori, Patrizia D’Amelio, Roberta Faccio, Giacomina Brunetti “The Interplay between the bone and the immune system” Clin Dev Immunol, 2013;2013:720504. doi: 10.1155/2013/720504. Epub 2013 Jul 14.
- Tomoki Nakashima, Hiroshi Takayanagi, “Osteoimmunology: crosstalk between the immune and bone systems” J Clin Immunol, 2009 Sep;29(5):555-67. doi: 10.1007/s10875-009-9316-6. Epub 2009 Jul 8
- Bruno Bordoni and Emiliano Zanier “Clinical and symptomatological reflections: the fascial system” J Multidiscip Healthc. 2014; 7: 401–411, PMCID: PMC4173815, PMID: 25258540, Published online 2014 Sep 18. doi: 10.2147/JMDH.S68308
- Thomas W Findley, Mona Shalwala “Fascia Research Congress evidence from the 100 year perspective of Andrew Taylor Still” J Bodyw Mov Ther, 2013 Jul;17(3):356-64, Epub 2013 May 29, PMID: 23768282 DOI: 10.1016/j.jbmt.2013.05.015
- Leonardo Vieira, “Embryology of the Fascial System” Published online 2020 Aug 30. Cureus. 2020 Aug; 12(8): e10134, doi: 10.7759/cureus.10134
- Adelaida María Castro-Sánchez,* Guillermo A. Matarán-Peñarrocha, José Granero-Molina, Gabriel Aguilera-Manrique, José Manuel Quesada-Rubio, and Carmen Moreno-Lorenzo, “Benefits of Massage-Myofascial Release Therapy on Pain, Anxiety, Quality of Sleep, Depression, and Quality of Life in Patients with Fibromyalgia” Evid Based Complement Alternat Med. 2011; 2011: 561753, Published online 2010 Dec 28. doi: 10.1155/2011/561753
- Bruno Bordoni and Maria Marcella Lagana, “Bone Tissue is an Integral Part of the Fascial System” Cureus. 2019 Jan; 11(1): e3824, Published online 2019 Jan 3. doi: 10.7759/cureus.3824
- https://clinicalherbalism.com/the-care-and-maintenance-of-the-fascial-web/



Martha B.
December 6, 2022 , 3:19 pmwow!