Table of Contents
Why Yoga is the Ideal Exercise for Older Adults | Dr. Fishman’s Research on Yoga and Osteoporosis | Before You Start: Yoga Foundations | The Fishman Method: 12 Yoga Poses for Stronger Bones (With Videos!) | 12 Yoga Poses: Free Printable PDF | Yoga for Osteoporosis Takeaways
If you’ve broken a bone or you have low bone density, you may not think yoga is for you… well, think again!
Yoga does three things to your body no other exercise does — and that makes it the perfect exercise for low bone density. (More on this in a moment!)
In fact, leading yoga for osteoporosis expert, Dr. Loren Fishman, has spent years perfecting a method to safely improve bone health through yoga. It’s a method he’s put to the test in two exciting clinical studies. Both of which showed that you can get great results by practicing 12 simple yoga poses a day…
And now, you can try these 12 yoga poses from the comfort of your own home! Yes, I’ve put together three new videos demonstrating all 12 poses. Each video showcases a different variation of the pose, so folks of all physical ability can benefit.
But first, let’s take a look at how yoga can help you stay strong, flexible, and pain-free…
To skip right to the yoga videos, click here!
Why Yoga is the Ideal Form of Exercise for Older Adults
When you apply force to bones, it stimulates them to grow stronger — a premise known as Wolff’s law.
Wolff’s law states that, “bone is formed and strengthens along lines of mechanical stress.” It also describes how the greater the forces applied to a bone, the greater the bone-building at the point of stress. (Bear these two points in mind, as we delve into the unique benefits of yoga.)
So it’s clear why experts recommend high-impact, weight-bearing exercise to stave off bone loss. Simple enough, right? Unfortunately, it’s a little more complicated than that. You need to consider your joints, and the length of time you’re activating your muscles for too…
I recently had the pleasure of discussing this topic with Dr. Fishman himself when I traveled to Portland for his Yoga vs. Osteoporosis training! Click on the video below to hear his take on the benefits of yoga for your joints, and how long to hold a yoga pose for:
So high-impact exercise can do more harm than good by aggravating your joints and causing inflammation. But yoga provides a solution.
According to Dr. Fishman, yoga’s gentle, low-impact movements are ideal for those with osteoporosis and osteoarthritis. These movements help distribute synovial fluid, which lubricates the joints and keeps them moving smoothly. (Synovial fluid is a thick liquid found in all your joints.)
And in terms of your bone health, there are three main reasons yoga is an excellent choice… (Yes, the length of time you hold poses for is one!)
3 Reasons Yoga Can Strengthen Your Bones
Yoga may be a slow and often stationary practice, but don’t be deceived by appearances. In yoga, your body is working incredibly hard. In fact, if practiced correctly, yoga can help keep your bones strong and healthy.
Here’s how:
- Yoga puts unusual force on bones, which other exercises don’t.
“By unusual, I mean two things:,” says Dr. Fishman.
First, yoga doesn’t just put force on one part of your body. If you play tennis, your racket arm may be especially strong. If you jog, your legs gain the most benefit. But the different positions in yoga accomplish the impressive task of engaging muscles and bones throughout your entire body. Second, yoga stresses bones at practically every angle. Yoga positions, or asanas, oppose one group of muscles against another and stimulate muscle-to-bone attachments. These forces signal mechanosensor cells (cells that respond to changes in mechanical force) in your body called osteocytes. Then, your osteocytes tell your osteoblasts (the specialized cells that build bone) it’s time to get to work! - In yoga, you hold poses for an extended period of time.
As mentioned in the video above, the length of time you hold yoga poses for is key. Often, yoga poses are held for several seconds. This isn’t something you do in many other forms of exercise…
And research shows that levels of bone-building markers increase in as little as 12 seconds of subjecting bone to stress! So yoga stimulates bone-building due to the length of time you spend holding poses — which places your bones and muscles under continual stress. - Practicing yoga causes your body to release a powerful anti-inflammatory.
“Exercise causes your body to release something called peroxisome proliferator-activated receptor gamma coactivator 1-alpha (PGC-1a),” says Dr. Fishman. “That’s a mouthful, I know!”
Simply put, PGC-1a is a protein that helps your body benefit from exercise. Most notably for those with osteoporosis, PGC-1α is a powerful anti-inflammatory. (Remember, chronic, low-grade inflammation causes bone loss!) Now, high-impact exercises release PGC-1a just like yoga. But as we’ve seen, high-impact exercise can aggravate your joints and cause inflammation. With yoga, you get all the anti-inflammatory benefits of PGC-1a — without also causing inflammation. It’s basically a win, win for your bones.
Additional Benefits of Yoga for Osteoporosis
We’ve seen how yoga safely stresses bones without impact, and how the practice supports your bone health! But there are many other benefits that make yoga uniquely well-suited for those with low bone density…
Yoga can help improve posture, balance, coordination, strength, and mobility — all key benefits for preventing a fall.
It also promotes a sense of peace and well-being. And as you may know, chronic stress can lead to bone loss. So by relieving stress, yoga indirectly benefits your bone health!
Finally, yoga is highly accessible. It’s easy to practice from the comfort of your home, and you need very little equipment to do it.
Have I convinced you yet? Perhaps, you’d like to see some concrete evidence of these benefits? Not to worry, next up Dr. Fishman will tell you about his research himself!
Dr. Fishman’s Research on Yoga and Osteoporosis
For years, Dr. Loren Fishman has been fascinated by yoga’s potential to improve bone health…
So in 2005, he decided to test his theory by running a pilot study. (A pilot study is a small-scale study to see whether a theory has merit.) And that pilot study led to a large-scale study published in 2016.
I asked Dr. Fishman about his studies when we met in Portland. Click on the studies below to see his explanation of each:
Dr. Loren Fishman is an Assistant Clinical Professor at Columbia University, and the Medical Director of Manhattan Physical Medicine and Rehabilitation in New York City. Dr. Fishman pioneered the use of yoga in medicine and has written several books on the topic, including Yoga for Osteoporosis and Yoga for Osteoarthritis.
Study #1 — Yoga for Osteoporosis: A Pilot Study
“My pilot study involved 11 subjects and seven controls with either osteopenia or osteoporosis. These subjects practiced 12 yoga poses daily for two years. At the end of the study, the subjects who practiced yoga had better bone mineral density (BMD) in the spine and hips compared to the controls.
Of course, I couldn’t draw a general conclusion from this small pilot study. But the results were encouraging. So I decided to conduct a much larger study next.”
Study #2 – Twelve-Minute Daily Yoga Regimen Reverses Osteoporotic Bone Loss
“My next study involved 227 active participants. These participants completed a health history questionnaire and shared the results of a recent DEXA scan. All participants were sent a DVD of the 12 yoga poses from the pilot study along with descriptions of each pose.
These participants were on average 68 years old and 83% of them had either osteopenia or osteoporosis.
After two years of practicing the 12 poses consistently, participants showed promising results. They reported bone density gains in the spine, hips, and femur.
Curious about the 12 yoga poses performed in these studies? You’re in luck. AlgaeCal put together videos demonstrating all 12 poses! Click here to check them out now.
What’s more, none of the 227 study participants experienced a fracture or injury related to the practice of yoga. That’s with more than 90,000 hours of yoga practiced largely by people with osteopenia or osteoporosis. So overall, the results of this study support the safety and efficacy of the Fishman Method for those with low bone density.”
Study #3 — New Yoga for Osteoporosis: A Dose Response Study (Ongoing)
“Despite the promising results from these studies, yoga hasn’t gained much traction in the medical community.
So, I’m conducting another, more robust study to show that properly chosen yoga poses can support strong bones. If you’re interested in participating, click on the following link and scroll down to “New Yoga for Osteoporosis: A Dose Response Study” for more details!”
Before You Start: Yoga Foundations
If you’re new to yoga, it’s a good idea to check in with your medical professional before getting started to make sure it’s suitable for you. I also recommend following along with a qualified instructor to start. That way, you can learn the basics of a safe practice.
For example, I studied how to teach yoga for osteoporosis with Dr. Fishman. (More on this in a moment!) So my videos are a good place to start.
But to give you a quick introduction, here are the basic principles of yoga:
The Basic Principles of Yoga
- The Breath. Pay special attention to your breath. Breathing smoothly and naturally enhances yoga poses. Holding your breath can cause fatigue and block awareness of your body. In general, inhale when lifting up or arching your back and exhale when settling into a pose or folding forward.
- The Foundation. Your foundation is the part of your body bearing weight. This is often your feet, hands, or pelvis. The key is to spread your foundation, so that you’re well supported. With your feet, try and use all four corners of each foot in a balanced way. Stretch your toes instead of contracting them. The same concept applies to your hands.
- The Curve of the Spine. Your spine has a natural curve that makes it strong. The goal when aligning your spine is to achieve a balance of strength and flexibility. Always bend from as low down in the spine as possible. Tilt your pelvis from the hips, not the waist. This will minimize any rounding of the spine and keep your back safe.
- The Balance of Opposites. If you’re new to yoga, you may wonder why poses include actions that are opposite. For example, you may be instructed to press down through your feet and reach up through your arms. This is to create a stable pressure on your bones, which makes poses safer and more effective.
- The Knees. In most poses, you’ll want to align your kneecaps to face the same direction as the second toe of the same leg. This can be challenging for some. If that’s the case for you, work toward it gradually. Maintaining this alignment will help protect your knees from dangerous torque.
- The Stance. For many poses, your feet will be wide apart. How wide depends on your height, your proportions, and your flexibility. If your stance is too wide, you might feel unstable. Always adjust your stance depending on what feels right for you. Your stance should allow for both freedom of movement and stability.
- The Full-Body.Every pose will draw your focus to certain areas of your body. While standing, you may feel your legs more. While sitting, you may focus on your spine. This is natural. But try and open your awareness to your whole body in every pose. Maximize your practice by engaging your entire body, rather than focusing on just one area.
A Note on Yoga Equipment
You don’t need much equipment to practice yoga. But there are a couple props I reference in the yoga poses to follow. The good news is, you can easily swap in common household items for most of these props!
Here’s a table outlining basic yoga equipment, and how to make do without:
| Equipment | Alternatives |
| Yoga mat | A towel, large woven blanket, or carpet that won’t slip |
| Yoga block | A stack of books wrapped in a towel, one thick book, or a shoebox filled with towels to make it solid |
| Yoga strap | A regular belt, robe tie, men’s tie, or piece of rope |
| Chair | A folding chair, dining room chair, or non-swivel desk chair would work best |
| Wall | If you don’t have an unobstructed wall to use, you may need to clear some space for your practice, or set up in a space like a garage |
The Fishman Method: 12 Yoga Poses for Stronger Bones
From years of research and experience in the field, Dr. Fishman developed a method for improving bone health through yoga.
Recently, I had the pleasure of learning this method directly from Dr. Fishman! I completed his Yoga vs. Osteoporosis training this past November. I’m also a Registered Yoga Teacher (RYT) and one of AlgaeCal’s Community Managers. All this to say, I’m well-versed in the intricacies of bone health and the importance of a safe practice.
So today, I’ll be demonstrating 12 yoga poses for osteoporosis. These are the same poses practiced in both Dr. Fishman’s studies — where participants improved their bone health.
Watch the full yoga regimen by clicking on the video below! You’ll see there are three videos with different variations of the poses:
1: “Osteoporosis Variation” – This class provides the easiest variation of the poses. It’s the orange thumbnail below.
2. “Osteopenia Variation” – This class provides intermediate variations of the poses. It’s the dark green thumbnail below.
3. “Prevention Variation” – This class provides the more challenging variations of the poses. It’s the light green thumbnail below.
You can click on the thumbnail of each video to skip between them. (Note you’ll also find detailed written instructions for each pose next!)
12 Yoga Poses: Step-by-Step Instructions and Tips
Now, there are three variations for most of these yoga poses: Osteoporosis, osteopenia, and prevention. Prevention is the regular version of the pose, commonly performed by those with normal bone density. But don’t take these labels as law!
In other words, just because you have osteoporosis, doesn’t mean you should do the osteoporosis version, and so on. I say this because the more challenging the pose, the more you stand to gain from it. So if you can do the osteopenia version, or even, the prevention version, go for it!
That said, it may be a good idea to work your way up depending on your skill level. You may also need to experiment a little to discover what’s right for you. Just remember to start slow, listen to your body, and give each pose your best effort.
To see the different variations for each pose, simply click on the black arrows!
Vrksasana (Tree) — Prevention
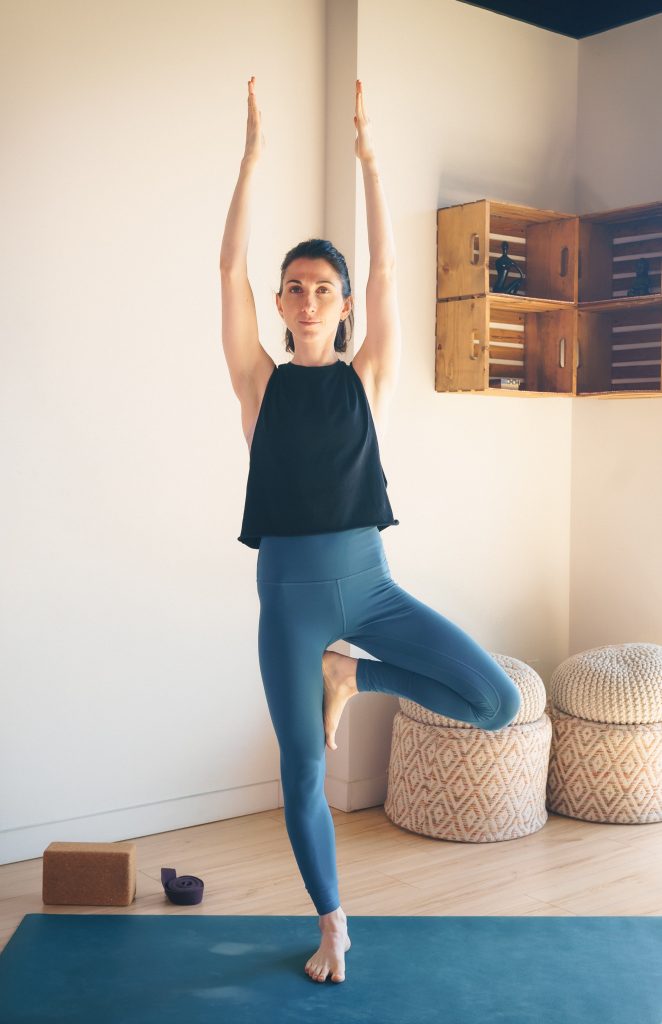
Benefits: This pose strengthens the legs and hips, and improves balance, posture, and focus.
Contraindications: If you have a severe rotator cuff injury, you should avoid this pose. If you have poor balance, you may also want to avoid this pose or adjust it to your needs.
Props: You’ll need a wall and a chair to perform the osteoporosis variation of this pose.
Tip: Too much or too little effort will increase the challenge of balancing in this pose. Try to establish a balance between two actions: The pull of all your muscles on your bones, and expanding from the center of your body out through your arms and legs.
Common misalignments:
- Leaning into the foot on the chair or on your thigh.
- Leaning backwards against the wall.
- Swinging the hip of the standing leg out to the side.
Prevention variation instructions:
- Stand with your feet together and spread your toes.
- Root down through the four corners of your feet and lift your inner arches up.
- Activate the muscles of your legs by squeezing up. Lengthen the back of your pelvis down and lift your abdomen up.
- Bring your left foot up to the top of the inner right thigh, with the toes pointing down. Press the right thigh and left foot against each other strongly for stability. Look straight ahead and find a place across the room to focus on to help you balance.
- Take a full inhalation and stretch your arms out to the side and up as far as you can vertically. You may join your palms together or keep your arms straight up near your ears. Pull your shoulders back.
- Keep stretching intensely through your arms, legs, and torso.
- Hold the pose for 30 seconds breathing evenly, or for as long as you can maintain these actions.
- Bring your left foot down and rest on two feet for a moment, taking several breaths.
- Repeat on your second side.
- Stand on both legs and take several breaths to rest.
Vrksasana (Tree) — Osteopenia
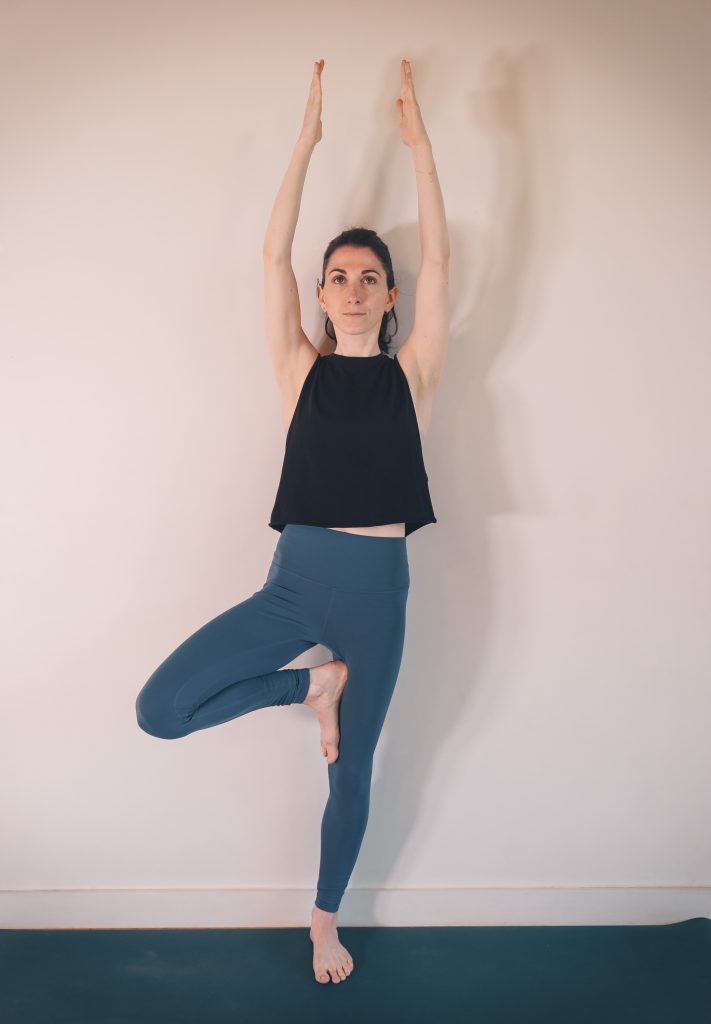
Benefits: This pose strengthens the legs and hips, and improves balance, posture, and focus.
Contraindications: If you have a severe rotator cuff injury, you should avoid this pose. If you have poor balance, you may also want to avoid this pose or adjust it to your needs.
Props: You’ll need a wall and a chair to perform the osteoporosis variation of this pose.
Tip: Too much or too little effort will increase the challenge of balancing in this pose. Try to establish a balance between two actions: The pull of all your muscles on your bones, and expanding from the center of your body out through your arms and legs.
Common misalignments:
- Leaning into the foot on the chair or on your thigh.
- Leaning backwards against the wall.
- Swinging the hip of the standing leg out to the side.
Osteopenia variation instructions:
- Stand with your back a few inches from the wall.
- Position your feet facing straight forward and parallel. Spread your toes. Root down through the four corners of your feet and lift your inner arches up.
- Activate the muscles of your legs by squeezing up. Lengthen the back of your pelvis down and lift your abdomen up.
- Pick up your left foot and place its sole on the inner edge of your right leg as high as you can, toes pointing down. Push the left foot and right inner leg against each other for stability. Look straight ahead and find a place across the room to focus on to help you balance.
- Take a big inhalation and stretch your arms out to the side and up as far as you can toward vertical. Touch the wall gently if you need to.
- Keep stretching intensely through your arms, legs, and torso.
- Hold the pose for 30 seconds breathing evenly, or for as long as you can maintain these actions.
- Bring your left foot down and rest on two feet for a moment, taking several breaths.
- Repeat on your second side.
- Stand on both legs and take several breaths to rest.
Vrksasana (Tree) — Osteoporosis
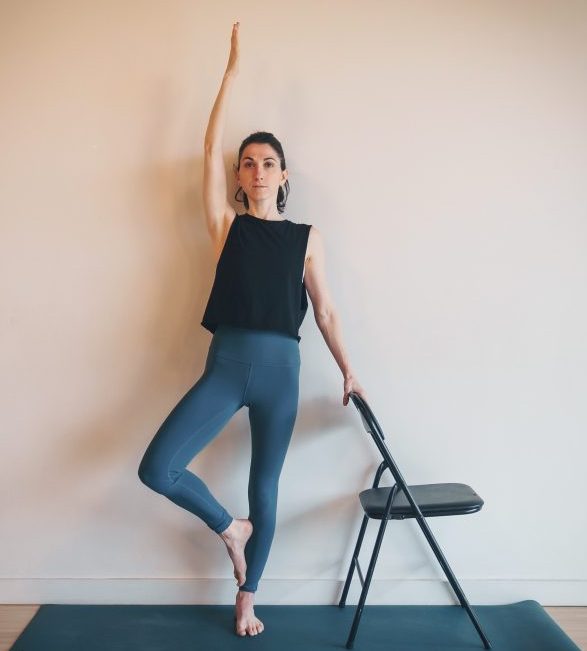
Benefits: This pose strengthens the legs and hips, and improves balance, posture, and focus.
Contraindications: If you have a severe rotator cuff injury, you should avoid this pose. If you have poor balance, you may also want to avoid this pose or adjust it to your needs.
Props: You’ll need a wall and a chair to perform the osteoporosis variation of this pose.
Tip: Too much or too little effort will increase the challenge of balancing in this pose. Try to establish a balance between two actions: The pull of all your muscles on your bones, and expanding from the center of your body out through your arms and legs.
Common misalignments:
- Leaning into the foot on the chair or on your thigh.
- Leaning backwards against the wall.
- Swinging the hip of the standing leg out to the side.
Osteoporosis variation instructions:
- Place a chair near a wall, facing to the side.
- Stand a few inches from the wall with the right side of your body alongside the back of the chair. Rest your right hand lightly on the chair.
- Position your feet facing forward and parallel. Spread your toes. Root down through the four corners of your feet and lift your inner arches up.
- Activate the muscles of your legs by squeezing up. Lengthen the back of your pelvis down and lift your abdomen up.
- Pick up your left foot and place its sole on the inner edge of your right leg as high as you can, toes pointing down. Push the left foot and right inner leg against each other for stability.
- Stretch your left arm out to the side or all the way up. Keep stretching intensely through your arms, legs, and torso.
- Hold the pose for 30 seconds breathing evenly, or as long as you can safely maintain these actions.
- Bring your left foot down and rest on two feet for a moment, taking several breaths.
- Repeat on your second side.
- Stand on both legs and take several breaths to rest.
Note: If you struggle with your balance, you can place your lifted foot on a chair, and stretch your arms straight out to your sides.
Props: You’ll need a wall and a chair to perform the osteoporosis variation of this pose.
Tip: Too much or too little effort will increase the challenge of balancing in this pose. Try to establish a balance between two actions: The pull of all your muscles on your bones, and expanding from the center of your body out through your arms and legs.
Common misalignments:
- Leaning into the foot on the chair or on your thigh.
- Leaning backwards against the wall.
- Swinging the hip of the standing leg out to the side.
Osteopenia variation instructions:
- Stand with your back a few inches from the wall.
- Position your feet facing straight forward and parallel. Spread your toes. Root down through the four corners of your feet and lift your inner arches up.
- Activate the muscles of your legs by squeezing up. Lengthen the back of your pelvis down and lift your abdomen up.
- Pick up your left foot and place its sole on the inner edge of your right leg as high as you can, toes pointing down. Push the left foot and right inner leg against each other for stability. Look straight ahead and find a place across the room to focus on to help you balance.
- Take a big inhalation and stretch your arms out to the side and up as far as you can toward vertical. Touch the wall gently if you need to.
- Keep stretching intensely through your arms, legs, and torso.
- Hold the pose for 30 seconds breathing evenly, or for as long as you can maintain these actions.
- Bring your left foot down and rest on two feet for a moment, taking several breaths.
- Repeat on your second side.
- Stand on both legs and take several breaths to rest.
Trikonasana (Triangle pose) — Prevention
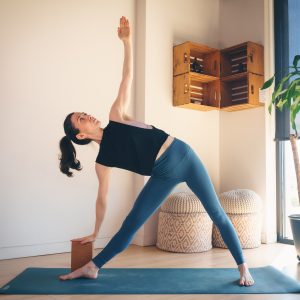
Benefits: This pose stresses the greater trochanters (part of the upper thigh bone), anterior lumbar and posterior thoracic vertebrae (upper and lower spine), and pubic bones. It helps build stamina, focus, and balance.
Contraindications: If you have any of the following conditions, you may want to avoid this pose: Achilles tendonitis; advanced hip arthritis; knee arthritis; ligamentous knee injuries; newly herniated disc; or pubic fracture.
Props: You’ll need a yoga mat, a chair and a wall for the osteoporosis variation, and a yoga block and a wall for the osteopenia version.
Tip: The wider your stance, the more freedom you’ll have in the hips. But don’t go so wide as to lose stability! Your knees may want to bend and your upper body will tend to shift forward. Keep your legs straight, your leg muscles firm, and your torso lined up directly above your front leg.
Common misalignments:
- Beginning with a rounded spine
- Rolling into the inner edge of your back foot (pronation)
- Throwing the top arm behind you (essentially rotating the upper arm bone internally)
Prevention variation instructions:
- Step your feet apart so that your ankles line up under your wrists when your arms stretch to the sides.
- Turn your right foot and leg 90 degrees to the right, but don’t turn your torso. Internally rotate your left foot 30 degrees toward the right. Align your right heel with the arch of your left foot.
- Inhale and stretch your arms firmly, pulling your shoulder blades toward your spine.
- Exhale and incline your torso to the right without bending or turning it. Your hips will shift to the left. Touch the floor on the outside of your right foot with your fingertips, or place your hand over your ankle. Rest your left hand on your waist.
- Lengthen out through the spine. Exhale and shift your hips more to the left.
- Extend your torso out over your right leg, bending at the hips, not the waist.
- Roll your left shoulder, left ribs, and left waist back and up, remaining steady in your legs. Stretch your left arm straight up toward the ceiling. Turn your head to look up at your left hand.
- Hold for 30 seconds breathing fully and stretching side to side as well as head to tail.
- Inhale as you come back up. You can take a moment here to rest, if you like.
- Repeat on your second side.
Trikonasana (Triangle pose) — Osteopenia
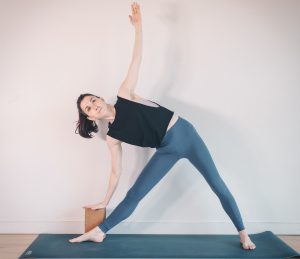
Benefits: This pose stresses the greater trochanters (part of the upper thigh bone), anterior lumbar and posterior thoracic vertebrae (upper and lower spine), and pubic bones. It helps build stamina, focus, and balance.
Contraindications: If you have any of the following conditions, you may want to avoid this pose: Achilles tendonitis; advanced hip arthritis; knee arthritis; ligamentous knee injuries; newly herniated disc; or pubic fracture.
Props: You’ll need a yoga mat, a chair and a wall for the osteoporosis variation, and a yoga block and a wall for the osteopenia version.
Tip: The wider your stance, the more freedom you’ll have in the hips. But don’t go so wide as to lose stability! Your knees may want to bend and your upper body will tend to shift forward. Keep your legs straight, your leg muscles firm, and your torso lined up directly above your front leg.
Common misalignments:
- Beginning with a rounded spine
- Rolling into the inner edge of your back foot (pronation)
- Throwing the top arm behind you (essentially rotating the upper arm bone internally)
Osteopenia variation instructions:
- Place your yoga mat along a wall, and a block near the end of your mat on the right side.
- Stand with your back to the wall but not touching it, and step your feet apart so that your ankles line up under your wrists when your arms stretch to the sides.
- Place your right foot next to the block, and turn the foot and leg parallel to the wall but aim your torso straight out from the wall. Internally rotate your left foot 30 degrees toward the right. Align your right heel with the arch of your left foot.
- With your arms outstretched, incline your torso to the right without bending it. Your hips will shift to the left. Rest your right hand on the block, and your left hand on your waist.
- Lengthen out through the spine. Exhale and shift your hips more to the left.
- Extend your torso out over your right leg, bending at the hips, not the waist.
- If you’re unsteady, lean your right hip and one or both shoulders lightly against the wall.
- Roll your left shoulder, left ribs, and left waist back and up, remaining steady in your legs. Stretch your left arm straight up toward the ceiling. Face straight forward, toward the middle of the room.
- Hold for 30 seconds, or as long as you can maintain these actions. Inhale as you come back up. Take a few moments to breathe while standing on your two feet if you like.
- Repeat on your second side.
Trikonasana (Triangle pose) — Osteoporosis
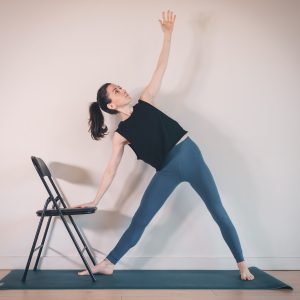
Benefits: This pose stresses the greater trochanters (part of the upper thigh bone), anterior lumbar and posterior thoracic vertebrae (upper and lower spine), and pubic bones. It helps build stamina, focus, and balance.
Contraindications: If you have any of the following conditions, you may want to avoid this pose: Achilles tendonitis; advanced hip arthritis; knee arthritis; ligamentous knee injuries; newly herniated disc; or pubic fracture.
Props: You’ll need a yoga mat, a chair and a wall for the osteoporosis variation, and a yoga block and a wall for the osteopenia version.
Tip: The wider your stance, the more freedom you’ll have in the hips. But don’t go so wide as to lose stability! Your knees may want to bend and your upper body will tend to shift forward. Keep your legs straight, your leg muscles firm, and your torso lined up directly above your front leg.
Common misalignments:
- Beginning with a rounded spine
- Rolling into the inner edge of your back foot (pronation)
- Throwing the top arm behind you (essentially rotating the upper arm bone internally)
Osteoporosis variation instructions:
- Place your yoga mat next to a wall. Place your chair next to the wall, facing toward you, near the front of your mat.
- Stand with your back to the wall. Step your feet apart so that your ankles line up under your wrists when your arms stretch to the sides.
- Turn your right foot and leg parallel to the wall. Your right toes will be just under the chair. Internally rotate the left foot 30 degrees toward the right. Align your right heel with the arch of your left foot.
- With your arms outstretched, incline your torso to the right without bending it. Your hips will shift to the left. Rest your right hand on the chair seat, and stretch your left hand out to the side.
- Lengthen out through the spine. Exhale and shift your hips more to the left.
- Extend your torso out over your right leg, bending at the hips, not the waist.
- If you’re unsteady, lean your right hip and one or both shoulders lightly against the wall.
- Roll your left shoulder, left ribs, and left waist back and up, remaining steady in your legs. Face straight forward, toward the middle of the room.
- Hold for 30 seconds, or as long as you can maintain these actions. Inhale as you come back up. Take a rest and several deep breaths, if you like.
- Repeat on your other side.
Virabhadrasana II (Warrior II) — Prevention
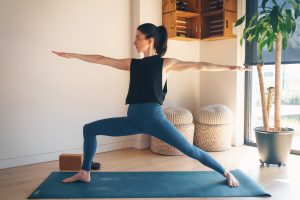
Benefits: This pose stimulates the femur and pelvic bones. It also improves hip mobility, balance, and leg strength.
Contraindications: If you have any of the following conditions, you may want to avoid or adjust this pose: Adductor tear; Achilles tendonitis; anterior cruciate ligament injury; chondromalacia patellae; plantar fasciitis; or sacroiliac joint derangement.
Props: A wall, chair, yoga mat, and block.
Tip: If you’re tall, try using a cushion or block on the chair seat to make it higher. Align your kneecap by pointing it toward your second toe.
Common misalignments:
- Shifting the torso forward
- Sinking into the lower back
- Knocking the front knee in towards center, or forward of the shin ankle
Prevention variation instructions:
- Stand on your mat, raise your arms to shoulder height, and step your feet apart so that your ankles line up under your wrists.
- Turn your right foot and leg out 90 degrees, but don’t turn your torso. Align your right heel with the mid-arch of your left foot.
- Inhale, firm your legs, and lengthen up through your spine.
- As you exhale, bend your right knee until it’s over your ankle. Point your knee toward your second toe.
- Check to see that your right knee is turned out sufficiently and that your shin is vertical. You may need to separate the feet farther and turn out the right thigh more to achieve this. In the full version of this pose, the right thigh should be parallel to the floor, requiring a very wide stance and deep flexion at the hips and knees.
- Move your tailbone down and lift your abdomen as you move your torso back up to vertical. This tailbone action initiates an outward rotation of both thighs, but especially the right one. These actions increase the forces on your pelvic bones and position the knees safely, so be sure to complete them.
- Spread your arms wide, palms down, shoulders back. Look to the right with your head, neck, and spine aligned straight up over the center of your pelvis.
- Broaden your upper chest and embody the strength of a warrior, extending out in all directions from the center of your pelvis.
- Hold for 30 seconds, breathing fully but softly.
- Repeat on the second side.
Virabhadrasana II (Warrior II) — Osteopenia
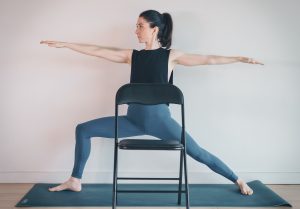
Benefits: This pose stimulates the femur and pelvic bones. It also improves hip mobility, balance, and leg strength.
Contraindications: If you have any of the following conditions, you may want to avoid or adjust this pose: Adductor tear; Achilles tendonitis; anterior cruciate ligament injury; chondromalacia patellae; plantar fasciitis; or sacroiliac joint derangement.
Props: A wall, chair, yoga mat, and block.
Tip: If you’re tall, try using a cushion or block on the chair seat to make it higher. Align your kneecap by pointing it toward your second toe.
Common misalignments:
- Shifting the torso forward
- Sinking into the lower back
- Knocking the front knee in towards center, or forward of the shin ankle
Osteopenia variation instructions:
- Place your mat along the wall and the chair in front of the middle of the mat, facing away from you. Stand with your back to the wall, raise your arms to shoulder height, and step your feet apart until your ankles are under your outstretched wrists. Once you have established this wide stance, hold the back of the chair for balance.
- Turn your right foot and leg parallel to the wall, but don’t turn your torso. Your right hip can lightly touch the wall for reference and support. Line up your right heel with the arch of the left foot.
- Inhale, firm your legs, and lengthen up through the spine.
- As you exhale, bend your right knee until it’s over the ankle. Point the knee toward the second toe.
- Using the chair support, lean a bit forward and move both inner groins back.
- Move the tailbone down and lift your abdomen as you move your torso back up to vertical. This tailbone action initiates an outward rotation of both thighs, but especially the right one. These actions result in the desired effect on your pelvic bones and the safest position for your knees, so be sure to perform them fully.
- Continue to hold the chair for balance. When you feel steady, spread your arms wide along the wall, palms down.
- Look to the right, with your head, neck, and spine aligned straight over the center of your pelvis.
- Hold this position for as long as you can, breathing fully and smoothly. Ideally, for 30 seconds.
- Take a rest, if you like. Then, repeat on the second side.
Virabhadrasana II (Warrior II) — Osteoporosis
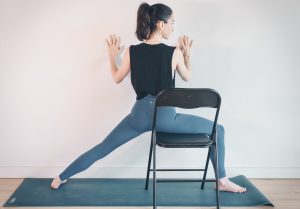
Benefits: This pose stimulates the femur and pelvic bones. It also improves hip mobility, balance, and leg strength.
Contraindications: If you have any of the following conditions, you may want to avoid or adjust this pose: Adductor tear; Achilles tendonitis; anterior cruciate ligament injury; chondromalacia patellae; plantar fasciitis; or sacroiliac joint derangement.
Props: A wall, chair, yoga mat, and block.
Tip: If you’re tall, try using a cushion or block on the chair seat to make it higher. Align your kneecap by pointing it toward your second toe.
Common misalignments:
- Shifting the torso forward
- Sinking into the lower back
- Knocking the front knee in towards center, or forward of the shin ankle
Osteoporosis variation instructions:
- Place your yoga mat perpendicular to a wall. Place a chair about 18 inches from the wall, facing it.
- Sit down on the edge of the chair and angle your right knee and foot to the side as much as possible. Your pelvis can turn to the right slightly but try and face toward the wall from the waist up.
- Stretch the left leg off the side of the chair. Turn your left foot and knees slightly toward the right. Adjust your buttocks and thighs back and apart.
- Inhale, lift up from inside, and firm your leg muscles. Straighten the left leg if you can.
- Exhale. Stay soft in your face and neck, but strong in your legs and spine.
- As you continue to breathe, root down through the pelvic bones, widen your thighs, and lift up through your spine.
- Rest your hands on the wall and use that directional reference to bring your upper torso to fully face the wall. Pull your shoulders gently back.
- It may take some effort to maintain the wide position of the legs, but that effort is what will benefit your pelvic bones.
- Stay in the pose for as long as you can steadily maintain the actions, then release. Ideally, hold this pose for 30 seconds.
- Take a rest, if you like. Then, repeat on the other side.
Parsvakonasana (Side angle pose) — Prevention
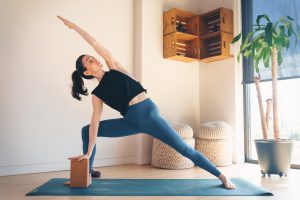
Benefits: Stimulates the entire central and peripheral skeleton.
Contraindications: You may want to avoid this pose if you have any of the following conditions: Carpal tunnel syndrome; coccygodynia; intervertebral disc herniation; ischial bursitis; labral tear of shoulder or hip; or spinal vertebral fracture.
Props: A yoga mat and a chair. Possibly, a blanket or block.
Tip: Adjust this pose for your height as necessary. If your front foot doesn’t reach the floor easily, place a block under it. Or if you’re tall, place a folded blanket on the chair seat.
Common misalignments:
- Laterally rounding the side of the torso that’s closest to the floor.
- Throwing the extended arm behind the body, which can create problems in the shoulder.
- Knocking the bent knee towards the center. Connected to this is turning the chest towards the floor.
Prevention variation instructions:
- Place a block toward the right side of your mat. Step your feet apart so that your ankles line up under your wrists when your arms are stretched to the sides.
- Turn your right foot and knee parallel to the long edge of the mat, but don’t turn your torso. Place your right foot so that the block is on the big-toe side of your foot.
- Inhale, firm your legs, and lengthen up through your spine. As you exhale, bend your right knee until it’s over your ankle. Point your knee toward your second toe.
- On your next exhalation, bend your torso to the right and place your right forearm on your right thigh. Place your left hand on your waist.
- Move your left thigh back, revolving slightly inward toward the midline at first.
- Curl your tailbone toward your left heel, tighten your lower belly, and rotate your left knee outward to face straight ahead.
- Place your right hand on the block and raise your left arm straight up toward the ceiling. Then, bring your left arm over your ear, palm facing down. Make sure it’s in the same diagonal line as the rest of your body, not forward or back.
- Stretch in all directions, making sure the muscles of your legs and abdomen are fully engaged.
- Hold for 30 seconds breathing quietly, or for as long as you can maintain these actions. Inhale as you come back up.
- Repeat on your second side.
Parsvakonasana (Side angle pose) — Osteopenia
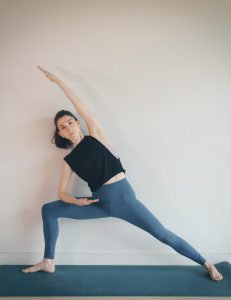
Benefits: Stimulates the entire central and peripheral skeleton.
Contraindications: You may want to avoid this pose if you have any of the following conditions: Carpal tunnel syndrome; coccygodynia; intervertebral disc herniation; ischial bursitis; labral tear of shoulder or hip; or spinal vertebral fracture.
Props: A yoga mat and a chair. Possibly, a blanket or block.
Tip: Adjust this pose for your height as necessary. If your front foot doesn’t reach the floor easily, place a block under it. Or if you’re tall, place a folded blanket on the chair seat.
Common misalignments:
- Laterally rounding the side of the torso that’s closest to the floor.
- Throwing the extended arm behind the body, which can create problems in the shoulder.
- Knocking the bent knee towards the center. Connected to this is turning the chest towards the floor.
Osteopenia variation instructions:
- Place your mat alongside a wall. Stand with your back to the wall and step your feet apart so that your ankles line up under your wrists when your arms are stretched to the sides.
- Turn your right foot and leg parallel to the wall, but don’t turn your torso. Your left foot faces straight out from the wall.
- Inhale, firm your legs, and lengthen up through your spine. As you exhale, bend your right knee until it’s over your ankle. Point your knee toward your second toe.
- As you inhale again, incline your torso over your right hip and rest your right forearm on your thigh. Your left hand can rest on your hip.
- Move your left thigh back toward the wall.
- Curl your tailbone toward your left heel, tighten your lower belly, and rotate your left knee outward to face away from the wall.
- Roll your left shoulder and chest up toward the ceiling and stretch your left arm straight out from your shoulder.
- Stretch in all directions, pulling your shoulders back toward the wall.
- Hold for 30 seconds breathing quietly, or for as long as you can maintain these actions. Inhale as you come back up.
- Repeat on your second side.
Parsvakonasana (Side angle pose) — Osteoporosis
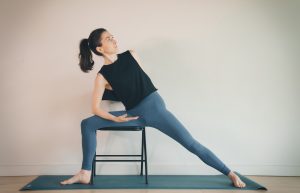
Benefits: Stimulates the entire central and peripheral skeleton.
Contraindications: You may want to avoid this pose if you have any of the following conditions: Carpal tunnel syndrome; coccygodynia; intervertebral disc herniation; ischial bursitis; labral tear of shoulder or hip; or spinal vertebral fracture.
Props: A yoga mat and a chair. Possibly, a blanket or block.
Tip: Adjust this pose for your height as necessary. If your front foot doesn’t reach the floor easily, place a block under it. Or if you’re tall, place a folded blanket on the chair seat.
Common misalignments:
- Laterally rounding the side of the torso that’s closest to the floor.
- Throwing the extended arm behind the body, which can create problems in the shoulder.
- Knocking the bent knee towards the center. Connected to this is turning the chest towards the floor.
Osteoporosis variation instructions:
- Sit on a chair with your knees wide apart.
- Widen your buttocks and upper thighs to tilt your pelvis and free up your hip joints.
- Open your right knee out to the side and place your foot directly under your knee.
- Lean to the right, moving from your hip, not your waist, and rest your right forearm on your thigh.
- Move your left leg to the left until it stretches straight, keeping your toes and your knee facing forward.
- Activate the muscles of your legs and abdomen and curl your tailbone down toward your left foot.
- Place your left hand on your left hip and roll your left shoulder back until your entire upper body faces outward.
- If you’d like to make this pose more intense, you can turn your torso enough to the left to grasp the back of the chair with your left hand, and look up.
- Hold this pose for 30 seconds breathing quietly and keeping your muscles activated, or for as long as you can maintain these actions. Then, release.
- Repeat on your second side.
Parivrtta Trikonasana (Twisted triangle) — Prevention
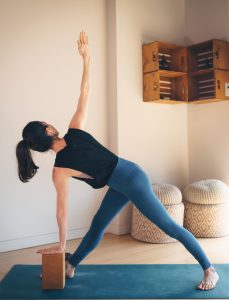
Benefits: This pose stresses the hips and anterior lumbar and posterior thoracic vertebrae (upper and lower spine). It helps build flexibility, focus, and balance.
Contraindications: If you have any of the following conditions, you may want to avoid this pose: Achilles tendonitis; advanced hip arthritis; knee arthritis; ligamentous knee injuries; newly herniated disc; or pubic fracture.
Props: A yoga mat. A chair and a wall for the osteoporosis variation and a block and a wall for the osteopenia version.
Tip: Try rotating your pelvis in the direction of the twist. This will help you get as much out of the twist as possible, while maintaining length in your spine.
Common misalignments:
- Beginning with a rounded spine
- Rolling into the inner edge of the back foot (pronation)
- Throwing the top arm behind you, essentially internally rotating the upper arm bone
Prevention variation instructions:
- Place your yoga mat along a wall.
- Stand facing the wall but not touching it, and step your feet apart so that your ankles line up under your wrists when your arms stretch to the sides. Place your left foot next to the block, and turn the foot and leg parallel to the wall but aim your torso straight out from the wall. Internally rotate your right foot 30 degrees toward the left. Align your left heel with the arch of your right foot.
- Stretch your arms out to either side of you. Gently turn the right side of your torso until you can rest your right hand on the floor in front of your left foot. If you’re tall, you may need to rest your hand on your left shin instead. Allow your left arm to lift up behind you, forming a straight line vertically with your right arm.
- Keep your neck straight and gaze forward. Avoid the temptation to lean into your hand.
- Inhale, firm your legs to keep them straight, and widen your sitting bones.
- Lengthen out through your spine. Distribute your weight more or less equally on both feet.
- Exhale and extend out through both your arms. Feel the twist in your right side and all along your spine.
- If you’re unsteady, you can lean your right hip and shoulder lightly against the wall.
- Hold for 30 seconds breathing evenly, or for as long as you can maintain these actions. Inhale as you come back up.
- Repeat on your second side.
Parivrtta Trikonasana (Twisted triangle) — Osteopenia
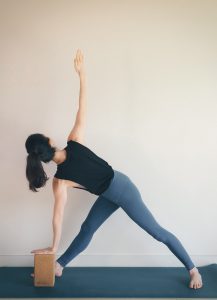
Benefits: This pose stresses the hips and anterior lumbar and posterior thoracic vertebrae (upper and lower spine). It helps build flexibility, focus, and balance.
Contraindications: If you have any of the following conditions, you may want to avoid this pose: Achilles tendonitis; advanced hip arthritis; knee arthritis; ligamentous knee injuries; newly herniated disc; or pubic fracture.
Props: A yoga mat. A chair and a wall for the osteoporosis variation and a block and a wall for the osteopenia version.
Tip: Try rotating your pelvis in the direction of the twist. This will help you get as much out of the twist as possible, while maintaining length in your spine.
Common misalignments:
- Beginning with a rounded spine
- Rolling into the inner edge of the back foot (pronation)
- Throwing the top arm behind you, essentially internally rotating the upper arm bone
Osteopenia variation instructions:
- Place your yoga mat along a wall, and a block near the end of your mat on the right side and another on the left side of your mat. Make sure the two blocks are in line.
- Stand facing the wall but not touching it, and step your feet apart so that your ankles line up under your wrists when your arms stretch to the sides. Place your left foot next to the block, and turn the foot and leg parallel to the wall but aim your torso straight out from the wall. Internally rotate your right foot 30 degrees toward the left. Align your left heel with the arch of your right foot.
- Stretch your arms out to either side of you. Gently turn the right side of your torso until you can rest your right hand on the block. Allow your left arm to lift up behind you, forming a straight line vertically with your right arm.
- Keep your neck straight and gaze forward. Avoid the temptation to lean into your hand.
- Inhale, firm your legs to keep them straight, and widen your sitting bones.
- Lengthen out through your spine. Distribute your weight more or less equally on both feet.
- Exhale and extend out through both your arms. Feel the twist in your right side and all along your spine.
- If you’re unsteady, you can lean your right hip and shoulder lightly against the wall.
- Hold for 30 seconds breathing evenly, or for as long as you can maintain these actions. Inhale as you come back up.
- Repeat on your second side.
Parivrtta Trikonasana (Twisted triangle) — Osteoporosis
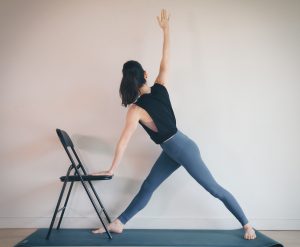
Benefits: This pose stresses the hips and anterior lumbar and posterior thoracic vertebrae (upper and lower spine). It helps build flexibility, focus, and balance.
Contraindications: If you have any of the following conditions, you may want to avoid this pose: Achilles tendonitis; advanced hip arthritis; knee arthritis; ligamentous knee injuries; newly herniated disc; or pubic fracture.
Props: A yoga mat. A chair and a wall for the osteoporosis variation and a block and a wall for the osteopenia version.
Tip: Try rotating your pelvis in the direction of the twist. This will help you get as much out of the twist as possible, while maintaining length in your spine.
Common misalignments:
- Beginning with a rounded spine
- Rolling into the inner edge of the back foot (pronation)
- Throwing the top arm behind you, essentially internally rotating the upper arm bone
Osteoporosis variation instructions:
- Place your yoga mat next to a wall. Place your chair next to the wall, facing toward you, near the front of your mat.
- Stand facing the wall. Step your feet apart so that your ankles line up under your wrists when your arms stretch to the sides. Turn your left foot and leg parallel to the wall. Your left toes will be just under the chair. Internally rotate your right foot 30 degrees toward the left. Align your left heel with the arch of your right foot.
- Stretch your arms out to either side of you. Gently turn the right side of your torso until you can rest your right hand on the chair. Allow your left arm to lift up behind you, forming a diagonal with your right arm.
- Keep your neck straight and gaze forward. Avoid the temptation to lean into your hand.
- Inhale, firm your legs to keep them straight, and widen your sitting bones.
- Lengthen out through your spine. Distribute your weight more or less equally on both feet.
- Exhale and extend out through both your arms. Feel the twist in your right side and all along your spine.
- If you’re unsteady, you can lean your right hip and shoulder lightly against the wall.
- Hold for 30 seconds breathing evenly, or for as long as you can maintain these actions. Inhale as you come back up.
- Repeat on your second side.
Salabhasana (Locust) — Prevention
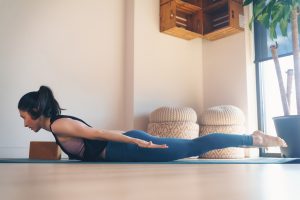
Benefits: Strengthens the spine and shoulder muscles for better posture. Stimulates the vertebrae.
Contraindications: You may want to avoid this pose if you have a recent or chronic back or neck injury.
Props: A yoga mat and a blanket.
Tip: Your lower back can feel like it gets pinched in this pose. To prevent this, elongate your tailbone and legs away from your lower back and draw your ribs and upper back forward. If you still feel a pinch, don’t rise as far up. Come up carefully and only go as far as is comfortable!
Common misalignments:
- Placing all the pressure in the lower back by coming up all at once
- Hunching the shoulders up towards the ears
- Overextending the back
Prevention variation instructions:
- Place your mat on the floor.
- Lie on your stomach with your arms at your sides. Rest your forehead on the mat with your legs straight behind you, hip-width apart. Press your weight evenly across the tops of both feet.
- Lengthen the crown of your head forward and your toes back to create length before you lift.
- Slowly raise your torso, arms, and legs off the floor.
- Turn your palms away from your body, so your upper arm bones rotate externally and your shoulder blades come together.
- Stretch actively from your pelvis down to your feet.
- Gaze forward and draw your shoulder blades back towards your spine to prevent them from curling forward.
- Hold for 30 seconds breathing evenly, or for as long as you can maintain these actions. Exhale as you slowly release your body to the ground.
- Rest your right ear on the mat and relax your arms at your sides for a few breaths.
- Repeat the pose for the same amount of time, then rest with your left ear on the mat for a few breaths.
Salabhasana (Locust) — Osteopenia
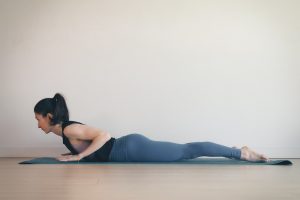
Benefits: Strengthens the spine and shoulder muscles for better posture. Stimulates the vertebrae.
Contraindications: You may want to avoid this pose if you have a recent or chronic back or neck injury.
Props: A yoga mat and a blanket.
Tip: Your lower back can feel like it gets pinched in this pose. To prevent this, elongate your tailbone and legs away from your lower back and draw your ribs and upper back forward. If you still feel a pinch, don’t rise as far up. Come up carefully and only go as far as is comfortable!
Common misalignments:
- Placing all the pressure in the lower back by coming up all at once
- Hunching the shoulders up towards the ears
- Overextending the back
Osteopenia variation instructions:
- Place your mat on the floor. Lay a blanket across the middle of the mat to support your torso.
- Lie on your stomach with your arms at your sides. Rest your forehead on the mat with your legs straight behind you, hip-width apart. Press your weight evenly across the tops of both feet.
- Place your hands underneath your shoulders with your palms facing down. Move your elbows in towards your midline and back towards your feet in order to get your shoulders away from your ears.
- Slowly raise your head, lifting all along your spine, until you’re gazing forward.
- Stretch actively from your pelvis down to your feet.
- Pull your shoulder blades back towards your spine to prevent them from curling forward.
- Gently lift your hands and allow them to hover just above the floor.
- Hold for 30 seconds breathing evenly, or for as long as you can maintain these actions. Exhale as you slowly release your body to the ground.
- Rest your right ear on the mat and relax your arms at your sides for a few breaths.
- Repeat the pose for the same amount of time, then rest with your left ear on the mat for a few breaths.
Salabhasana (Locust) — Osteoporosis
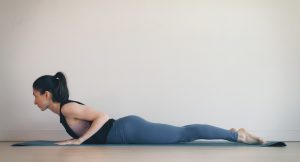
Benefits: Strengthens the spine and shoulder muscles for better posture. Stimulates the vertebrae.
Contraindications: You may want to avoid this pose if you have a recent or chronic back or neck injury.
Props: A yoga mat and a blanket.
Tip: Your lower back can feel like it gets pinched in this pose. To prevent this, elongate your tailbone and legs away from your lower back and draw your ribs and upper back forward. If you still feel a pinch, don’t rise as far up. Come up carefully and only go as far as is comfortable! Common misalignments:
- Placing all the pressure in the lower back by coming up all at once
- Hunching the shoulders up towards the ears
- Overextending the back
Osteoporosis variation instructions:
- Place your mat on the floor. Lay a blanket across the middle of the mat to support your torso if you like.
- Lie on your stomach with your arms at your sides. Rest your forehead on the mat with your legs straight behind you, hip-width apart. Press your weight evenly across the tops of both feet.
- Place your hands underneath your shoulders with your palms facing down.
- Move your elbows in towards your midline and back towards your feet in order to get your shoulders away from your ears.
- Slowly raise your head, lifting all along your spine, until you’re gazing forward.
- Stretch actively from your pelvis down to your feet.
- Pull your shoulder blades back towards your spine to prevent them from curling forward.
- Hold for 30 seconds breathing evenly, or for as long as you can maintain these actions. Exhale as you slowly release your body to the ground.
- Rest your right ear on the mat and relax your arms at your sides for a few breaths.
- Repeat the pose for the same amount of time, then rest with your left ear on the mat for a few breaths.
Setu Bandhasana (Bridge) — Prevention
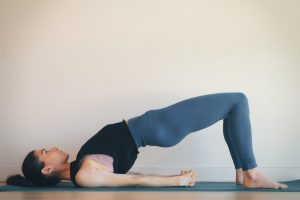
Benefits: Strengthens the lower elements of your spine, your core, buttocks, hamstrings, and the deep inner muscles that act as hip stabilizers. Strengthening these muscle groups helps improve balance and stability.
Contraindications: If you have any of the following conditions, you may want to avoid this pose: Arnold-Chiari malformations; facet syndrome; sacroiliac joint derangement; scoliosis; spinal stenosis; spondylolisthesis; and spondylolysis.
Props: A yoga mat, a blanket, and a belt.
Tip: Keep your legs and feet parallel. Relax your neck, throat, and jaw as you breathe. Avoid squeezing your buttocks too tightly or pulling your arms towards your feet.
Common misalignments:
- Turning the toes outward, thus turning the knees out, so that the knees don’t align over the heels
- Tucking the pelvis under and gripping the buttocks
- Focusing too much on the backbend in the lumbar spine, as opposed to the thoracic spine
Prevention variation instructions:
- Place your mat on the floor with a folded blanket across its upper half. Lie on your back with the tops of your shoulders on the top edge of the folded blanket and your head on the mat.
- Bend your knees, and place your feet hip-width apart and parallel — about six to eight inches from your hips, depending how tall you are!
- Place your arms alongside your body with your palms facing up.
- Exhale and engage your abdominal muscles.
- Inhale and slowly lift your hips and chest.
- Interlace your fingers behind you, but keep your wrists separated. Press your arms down into the floor to propel your torso upward.
- Engage your buttock muscles without squeezing them too tightly.
- Press your shoulders toward the floor by contracting the muscles between your shoulder blades.
- Hold these two actions — shoulders and arms pressing down, pelvis pressing up — for 30 seconds or as long as you can. Continue to breathe evenly.
- Slowly lower back down to the floor and take a couple deep breaths to relax.
Setu Bandhasana (Bridge) — Osteoporosis / Osteopenia
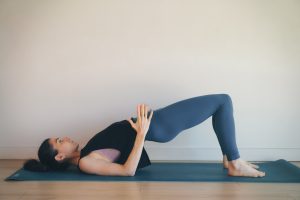
Benefits: Strengthens the lower elements of your spine, your core, buttocks, hamstrings, and the deep inner muscles that act as hip stabilizers. Strengthening these muscle groups helps improve balance and stability.
Contraindications: If you have any of the following conditions, you may want to avoid this pose: Arnold-Chiari malformations; facet syndrome; sacroiliac joint derangement; scoliosis; spinal stenosis; spondylolisthesis; and spondylolysis.
Props: A yoga mat, a blanket, and a belt.
Tip: Keep your legs and feet parallel. Relax your neck, throat, and jaw as you breathe. Avoid squeezing your buttocks too tightly or pulling your arms towards your feet.
Common misalignments:
- Turning the toes outward, thus turning the knees out, so that the knees don’t align over the heels
- Tucking the pelvis under and gripping the buttocks
- Focusing too much on the backbend in the lumbar spine, as opposed to the thoracic spine
Osteoporosis/osteopenia variation instructions:
- Place your mat on the floor with a folded blanket across its upper half if you like. Lie on your back with the tops of your shoulders on the top edge of the folded blanket and your head on the mat.
- Bend your knees, and place your feet hip-width apart and parallel — about six to eight inches from your hips, depending how tall you are!
- Place your arms alongside your body with your palms facing up.
- Exhale and engage your abdominal muscles.
- Inhale and slowly lift your hips and chest.
- Bend your elbows 90 degrees and point your fingers up toward the ceiling.
- Engage your buttock muscles without squeezing them too tightly.
- Press your shoulders toward the floor by contracting the muscles between your shoulder blades.
- Hold these two actions — shoulders pressing down, pelvis pressing up — for 30 seconds or as long as you can. Continue to breathe evenly.
- Slowly lower back down to the floor and take a couple deep breaths to relax.
Supta Padangusthasana I (Supine hand-to-foot I) — Prevention
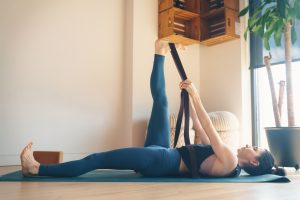
Benefits: Gently and safely stretches the hamstrings and the hips. This helps to increase flexibility in the hips.
Contraindications: If you have an injury to your hamstrings, quadriceps, or shoulders, you may want to avoid this pose.
Props: A yoga mat, a blanket, a belt, and a chair.
Tip: In order for this pose to be effective, you need to really engage your legs. You can accomplish this by pushing the ball of your top foot into the strap and pressing the back of your bottom thigh towards the floor or the chair.
Common misalignments:
- Hiking the hip of the lifted leg up towards the head
- Relaxing the bottom leg
- Lifting the chin up, thus over extending the cervical spine
Prevention variation instructions:
- Place a yoga mat on the floor, with a blanket across its upper half. Lie on your back with the tops of your shoulders on the top edge of the folded blanket and your head on the mat.
- Bend your right knee with your foot on the floor.
- Loop a belt around your right foot and hold both ends of the belt with your right hand.
- Slowly lift your right leg until it’s as straight as possible. If you can, aim for your leg to be at a 60 degree angle from the floor.
- Keep your gaze forward and your breath even.
- Engage your legs by pressing into the belt with your foot and pressing your left thigh into the floor.
- Keep your spine straight and your shoulders relaxed.
- Hold for 30 seconds breathing evenly, or for as long as you can maintain these actions.
- Gently lower your foot back down and take a moment to rest, if you like.
- Repeat on your other side.
Supta Padangusthasana I (Supine hand-to-foot I) — Osteopenia
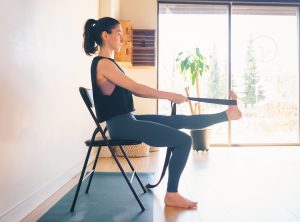
Benefits: Gently and safely stretches the hamstrings and the hips. This helps to increase flexibility in the hips.
Contraindications: If you have an injury to your hamstrings, quadriceps, or shoulders, you may want to avoid this pose.
Props: A yoga mat, a blanket, a belt, and a chair.
Tip: In order for this pose to be effective, you need to really engage your legs. You can accomplish this by pushing the ball of your top foot into the strap and pressing the back of your bottom thigh towards the floor or the chair.
Common misalignments:
- Hiking the hip of the lifted leg up towards the head
- Relaxing the bottom leg
- Lifting the chin up, thus over extending the cervical spine
Osteopenia variation instructions:
- Sit slightly forward in a chair, so that you’re not resting against its back. Engage your abdominals and keep your spine straight.
- Plant your feet firmly on the floor, hip-distance apart. Lengthen up through your spine.
- Loop a belt around the bottom of your right foot and hold onto it with your both hands.
- Slowly lift your right leg until it’s straight out in front of you while maintaining a slight bend in your knee.
- Make sure to keep your spine straight and your chest lifting up as your leg lifts.
- Keep your gaze forward and your breath even.
- Engage your legs by pressing into the belt with your foot and pressing into the chair with the bottoms of your thighs.
- Hold for 30 seconds breathing evenly, or for as long as you can maintain these actions.
- Gently lower your foot back down and take a moment to rest, if you like.
- Repeat on your other side.
Supta Padangusthasana I (Supine hand-to-foot I) — Osteoporosis
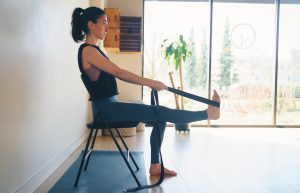
Benefits: Gently and safely stretches the hamstrings and the hips. This helps to increase flexibility in the hips.
Contraindications: If you have an injury to your hamstrings, quadriceps, or shoulders, you may want to avoid this pose.
Props: A yoga mat, a blanket, a belt, and a chair.
Tip: In order for this pose to be effective, you need to really engage your legs. You can accomplish this by pushing the ball of your top foot into the strap and pressing the back of your bottom thigh towards the floor or the chair.
Common misalignments:
- Hiking the hip of the lifted leg up towards the head
- Relaxing the bottom leg
- Lifting the chin up, thus over extending the cervical spine
Osteoporosis variation instructions:
- Sit in a chair, using the back of the chair to help support your spine.
- Plant your feet firmly on the floor, hip-distance apart. Lengthen up through your spine.
- Loop a belt around the bottom of your right foot and hold onto it with both hands.
- Slowly lift your right leg until it’s straight out in front of you while maintaining a slight bend in your knee.
- Press back into the chair with your spine and lift your chest, as the leg lifts.
- Keep your gaze forward and your breath even.
- Engage your legs by pressing into the belt with your foot and pressing into the chair with the bottoms of your thighs.
- Hold for 30 seconds breathing evenly, or for as long as you can maintain these actions.
- Gently lower your foot back down and take a moment to rest, if you like.
- Repeat on your other side.
Supta Padangusthasana II (Supine hand-to-foot II) — Prevention
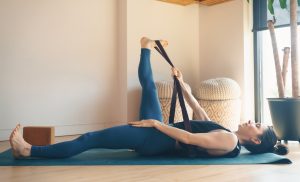
Benefits: Gently and safely stretches your hamstrings, calves, and inner thighs. Increases flexibility in the hips and aligns the pelvis.
Contraindications: If you have an injury to your hamstrings, quadriceps, or shoulders, you may want to avoid this pose.
Props: A yoga mat, a chair, and a belt.
Tip: The most challenging part of this pose is keeping your hips facing forward while rotating your leg out to the side. To help achieve this, make sure your abdominals are activated and your bottom thigh is grounding down into the floor or chair.
Common misalignments:
- Tilting the pelvis towards the lifted leg
- Allowing the leg to go too far out to the side, thus making the pose passive
- Relaxing the leg that’s on the floor
Prevention variation instructions:
- Place a yoga mat on the floor, with a blanket across its upper half. Lie on your back with the tops of your shoulders on the top edge of the folded blanket and your head on the mat.
- Loop a belt around your right foot and hold both ends of the belt with your right hand.
- Slowly lift your right leg off the floor and to the side. Aim for your leg to be at a 60 degree angle.
- Keep your other leg a little more internally rotated, with your toes pointing up and the back of your thigh grounding down.
- Gaze forward and breathe evenly.
- Engage your legs by pressing into the belt with your foot and pressing your left thigh into the floor.
- Keep your spine straight and your shoulders relaxed.
- Hold for 30 seconds breathing evenly, or for as long as you can maintain these actions.
- Gently lower your foot back down and take a moment to rest, if you like.
- Repeat on your other side.
Supta Padangusthasana II (Supine hand-to-foot II) — Osteopenia
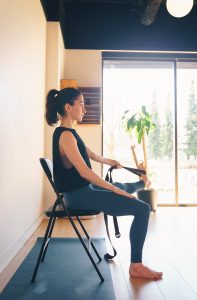
Benefits: Gently and safely stretches your hamstrings, calves, and inner thighs. Increases flexibility in the hips and aligns the pelvis.
Contraindications: If you have an injury to your hamstrings, quadriceps, or shoulders, you may want to avoid this pose.
Props: A yoga mat, a chair, and a belt.
Tip: The most challenging part of this pose is keeping your hips facing forward while rotating your leg out to the side. To help achieve this, make sure your abdominals are activated and your bottom thigh is grounding down into the floor or chair.
Common misalignments:
- Tilting the pelvis towards the lifted leg
- Allowing the leg to go too far out to the side, thus making the pose passive
- Relaxing the leg that’s on the floor
Osteopenia variation instructions:
- Place a yoga mat on the floor, with a blanket across its upper half. Lie on your back with the tops of your shoulders on the top edge of the folded blanket and your head on the mat.
- Loop a belt around your right foot and hold both ends of the belt with your right hand.
- Slowly lift your right leg off the floor and to the side. Aim for your leg to be at a 30 degree angle.
- Keep your other leg a little more internally rotated, with your toes pointing up and the back of your thigh grounding down. Don’t let your hip come up off the floor.
- Gaze forward and breathe evenly.
- Engage your legs by pressing into the belt with your foot and pressing your left thigh into the floor.
- Keep your spine straight and your shoulders relaxed.
- Hold for 30 seconds breathing evenly, or for as long as you can maintain these actions.
- Gently lower your foot back down and take a moment to rest, if you like.
- Repeat on your other side.
Supta Padangusthasana II (Supine hand-to-foot II) — Osteoporosis
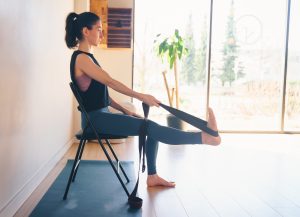
Benefits: Gently and safely stretches your hamstrings, calves, and inner thighs. Increases flexibility in the hips and aligns the pelvis.
Contraindications: If you have an injury to your hamstrings, quadriceps, or shoulders, you may want to avoid this pose.
Props: A yoga mat, a chair, and a belt.
Tip: The most challenging part of this pose is keeping your hips facing forward while rotating your leg out to the side. To help achieve this, make sure your abdominals are activated and your bottom thigh is grounding down into the floor or chair.
Common misalignments:
- Tilting the pelvis towards the lifted leg
- Allowing the leg to go too far out to the side, thus making the pose passive
- Relaxing the leg that’s on the floor
Osteoporosis variation instructions:
- Sit in a chair, using the back of the chair to help support your spine.
- Plant your feet firmly on the floor, hip-distance apart. Lengthen up through your spine.
- Loop a belt around the bottom of your right foot and hold onto it with your right hand.
- Slowly lift your right leg up and to the side, while maintaining a slight bend in your knee. Only go so far as you can while keeping your hips pointing forward.
- Press back into the chair with your spine and lift your chest, as the leg lifts.
- Keep your gaze forward and your breath even.
- Engage your legs by pressing into the belt with your foot and pressing into the chair with the bottoms of your thighs.
- Hold for 30 seconds breathing evenly, or for as long as you can maintain these actions.
- Gently lower your foot back down and take a moment to rest, if you like.
- Repeat on your other side.
Marichyasana II (Straight-legged twist) — Osteopenia
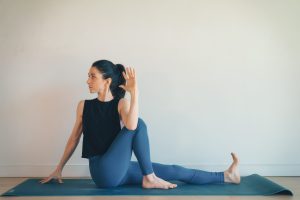
Benefits: Stresses and strengthens the lumbar and thoracic vertebrae (the lower and upper spine), shoulder joint, and the femurs. Teaches focus and calm under pressure.
Contraindications: You may want to avoid this pose if you’re vulnerable to dislocation in your shoulders or hips, have severe shoulder arthritis, or a recently herniated disc.
Props: A chair, a yoga mat, and a blanket.
Tip: Be mindful of your alignment in this twist, even if it means you don’t twist as far. Move into the twist with full awareness to prevent yourself from going too far.
Common misalignments:
- Knocking the bent knee in towards center
- Rounding the spine
- Lifting the chin too high, thus over extending the cervical spine
Osteopenia variation instructions:
- Place a yoga mat on the floor, with a folded blanket on its upper half if you like.
- Sit on the edge of the folded blanket with your legs straight forward.
- Pull your buttocks and upper thighs back and apart to help tip your pelvis forward properly.
- Bend your right knee and place your foot flat on the floor close to your hip. Root down through your left leg.
- Inhale, lift your spine, and turn toward the right. Hook your left elbow on the outside of your right knee.
- Keep your spine as tall as possible. Point your left hand straight up. Your right hand stays on the floor to your side and helps to support your spine.
- Inhale and twist more with your exhalation, if it’s available to you.
- Maintain a steady breath and a calm mind, as you hold this pose.
- Hold for 30 seconds or for as long as you can maintain these actions.
- Release and repeat on your other side.
Note: The prevention version of this pose involves a binding. Though beneficial if performed safely, bindings are very challenging and not available to most people. For these reasons, the binding version isn’t pictured here.
Marichyasana II (Straight-legged twist) — Osteoporosis
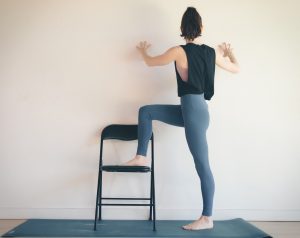
Benefits: Stresses and strengthens the lumbar and thoracic vertebrae (the lower and upper spine), shoulder joint, and the femurs. Teaches focus and calm under pressure. Contraindications: You may want to avoid this pose if you’re vulnerable to dislocation in your shoulders or hips, have severe shoulder arthritis, or a recently herniated disc. Props: A chair, a yoga mat, and a blanket. Tip: Be mindful of your alignment in this twist, even if it means you don’t twist as far. Move into the twist with full awareness to prevent yourself from going too far. Common misalignments:
- Knocking the bent knee in towards center
- Rounding the spine
- Lifting the chin too high, thus over extending the cervical spine
Osteoporosis variation instructions:
- Place a chair against a wall. Stand facing the seat of the chair with your feet parallel and hip-width apart.
- Place your right foot on the chair seat, with your knee and foot aligned in front of your hip.
- Engage your legs, spinal muscles, and abdomen.
- Place your right hand on your waist and your left hand on your right thigh.
- Inhale, stretch up through your spine, and root down through your left leg.
- Exhale and turn your spine (above the pelvis) to the right. Pull with your left hand on your right knee to help yourself twist.
- Keep your left leg firmly rooted and resist the temptation to move it forward. Open your right shoulder back to the right.
- Keep your shoulders and head level, and work carefully in this pose with moderate effort. You don’t want to twist too aggressively, or too gently. Find what feels right for you.
- Hold for 30 seconds or for as long as you can maintain these actions.
- Release and repeat on your other side.
Matsyendrasana (Bent-knee twist) — Osteopenia
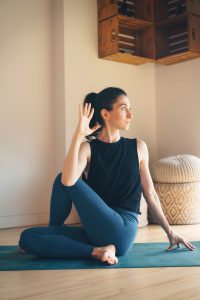
Benefits: This pose puts a resistive load on the entire skeleton, one side at a time. It stretches the back muscles and encourages mobility in the spine and vertebrae. Contraindications: You may want to avoid this pose if you have any of the following conditions: Colostomy, herniated lumbar disc, rotator cuff tear, spondylolisthesis, or vertebral fracture. Props: A yoga mat, a chair, a wall, and a blanket. Tip: Always lengthen your spine upward before rotating. At the same time, root down through your pelvic bones and use your abdominal muscles to help you twist. Common misalignments:
- Rolling to the outer edge of the foot that is on the floor
- Rounding the spine
- Lifting the chin up (over extending the cervical spine), as opposed to the chest
Osteopenia variation instructions:
- Place a folded blanket on your mat and sit on the blanket with your legs stretched out in front of you.
- Bend your left knee and place your left foot on the floor outside your right leg, with your shin vertical.
- Bend your right knee and bring your right foot to the outside of your left hip, with your knee on the floor and pointing forward.
- Place both your hand on your left knee.
- As you inhale, lift your spine up and root down through your pelvic bones.
- As you exhale, turn toward the left.
- Cross your right elbow to the outside of your left knee and point your hand upward and bring your left hand to the floor behind you.
- Gaze over your left shoulder, keeping your spine long. Move deeper into the twist, if you feel comfortable doing so.
- Hold for 30 seconds breathing evenly, or for as long as you can maintain these actions. Slowly release and repeat on your other side.
- After completing both sides, take a moment to feel the effects of this pose on your entire body.
Note: The prevention version of this pose involves a binding. Though beneficial if performed safely, bindings are very challenging and not available to most people. For these reasons, the binding version isn’t pictured here.
Matsyendrasana (Bent-knee twist) — Osteoporosis
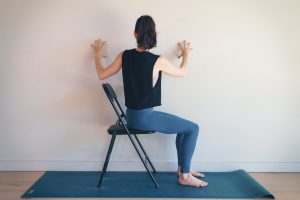
Benefits: This pose puts a resistive load on the entire skeleton, one side at a time. It stretches the back muscles and encourages mobility in the spine and vertebrae. Contraindications: You may want to avoid this pose if you have any of the following conditions: Colostomy, herniated lumbar disc, rotator cuff tear, spondylolisthesis, or vertebral fracture. Props: A yoga mat, a chair, a wall, and a blanket. Tip: Always lengthen your spine upward before rotating. At the same time, root down through your pelvic bones and use your abdominal muscles to help you twist. Common misalignments:
- Rolling to the outer edge of the foot that is on the floor
- Rounding the spine
- Lifting the chin up (over extending the cervical spine), as opposed to the chest
Osteoporosis variation instructions:
- Place a chair with its left side about six inches from a wall. Sit with your feet parallel and hip-width apart.
- As you inhale, lift your spine up and root down through your pelvic bones.
- As you exhale, turn toward the wall and place both hands on it, wherever they fall comfortably.
- Drag your hands down the wall as if you’re trying to pull it down, so your spine lengthens. You can also place a block between your hip and the wall to help with this.
- Press down through your thighs. Activate your abdominal muscles to help you twist.
- Keep lengthening up through your spine and resist the temptation to tilt your head.
- Continue to breathe and move deeper into the twist, if you feel comfortable doing so.
- Hold for 30 seconds breathing evenly, or for as long as you can maintain these actions.
- Slowly release and repeat on your other side.
- After completing both sides, take a moment to feel the effects of this pose on your entire body.
Savasana (Corpse pose) — Osteoporosis / Osteopenia / Prevention
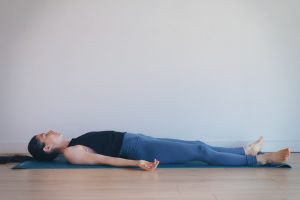
Benefits: Allows you to fully relax and reflect after a challenging practice. Contraindications: Women in the late stage of pregnancy may want to avoid this pose. Props: A yoga mat. Blankets and eye cover (optional). Tip: After the initial setup, avoid fussing or fidgeting in this pose. Allow your body to settle and still your mind to reap the most benefits. Common misalignments:
- Allow your body to fully relax in this pose
Osteoporosis/osteopenia/prevention variation instructions:
- Make sure your space is quiet and safe from distractions.
- Place your yoga mat and use blankets under your head, shoulders, and knees if you like. You can also cover your eyes with a small towel to help relax your face.
- Lie on your back with your arms at your sides and your palms up.
- Let your feet roll apart as you relax.
- Lengthen your buttocks away from your waist if you feel any compression in your lower back.
- Tuck your shoulder blades gently in toward your spine to open the front of your chest.
- Guide your attention systematically through your whole body, from head to toe and back again, letting each part relax thoroughly.
- Don’t fret if your mind produces thoughts. Observe them come and go.
- After a few minutes of quiet rest or whenever you feel ready, come slowly out of the pose, stretching your arms and legs, and breathing deeply.
- Respect whatever changes you may feel from your yoga practice and affirm your process of growth and healing.
12 Yoga Poses for Osteoporosis: Free Printable PDF
I hope you benefit greatly from these 12 yoga poses. Remember, practicing them can help you improve your bone health in just 12 minutes a day!
But I know this is a lot of information to take in. So to make it easy for you to adopt this regimen, we put together a free printable PDF of all 12 poses. That way, you can have a hard copy to study, mark up, and follow along.
Simply, click on the button below, input your name and email, and your PDF will be on its way promptly!
Yoga for Osteoporosis Takeaways
For anyone with low bone density, I can’t recommend yoga enough.
If you’ve never tried it before, don’t be frightened by all the impressive feats of flexibility pictured in the media…
The 12 poses in Dr. Fishman’s regimen are accessible for almost everybody. Practice them every day, and not only will you cultivate peace, strength, and balance, you’ll also be doing a wonderful favor for your bones.
If you’re looking for some variety, you may enjoy my yoga videos from the AlgaeCal YouTube page too! Check them out at the following links:
>> Chair Yoga for Osteoporosis
Dr. Fishman also offers weekly online classes on his website here! Simply, click on that link and scroll down to recorded web events. Then, click on the meeting recording and enter the access password.
I hope this has been helpful, and I wish you all the best in your practice. Please, don’t hesitate to ask questions or share your thoughts on these yoga poses in the comments below!
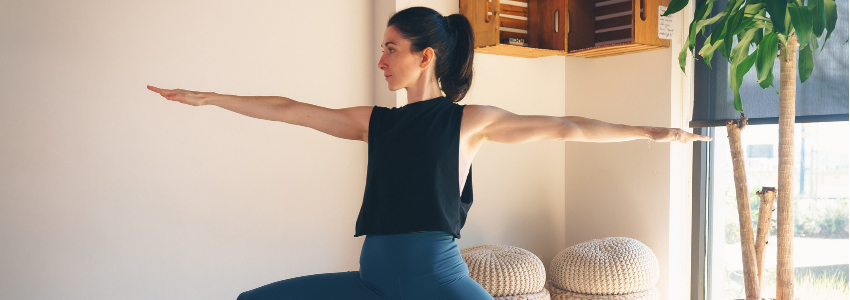



Irma
August 26, 2016 , 5:31 amThank you for posting these exercises, I will start working on them this weekend.